> ## Documentation Index
> Fetch the complete documentation index at: https://ampersand-24eb5c1a-cobalt0s-google-contacts.mintlify.site/llms.txt
> Use this file to discover all available pages before exploring further.
# QuickBooks
## What's Supported
### Supported actions
* [Proxy Actions](/proxy-actions), using the base URL `https://quickbooks.api.intuit.com`.
### Example Integration
```yaml theme={null}
# amp.yaml
specVersion: 1.0.0
integrations:
- name: quickbooksIntegration
displayName: QuickBooks Integration
provider: quickbooks
proxy:
enabled: true
```
QuickBooks API returns XML responses by default. To receive JSON responses, make sure to set the `Accept` header to `application/json` in your proxy API calls.
## Before you get started
You'll need a QuickBooks account and will need to create a QuickBooks app to obtain the necessary OAuth2 credentials.
### Creating a QuickBooks App
1. Go to the [Intuit Developer Dashboard](https://developer.intuit.com/)
2. Sign in with your Intuit account or create one if needed
3. Click **Create an app**
4. Choose **QuickBooks Online Accounting API**
5. Provide your app details:
* **App name**: Choose a descriptive name for your app
* **Description**: Brief description of your integration
6. Click **Create app**
7. Once created, navigate to the **Keys & OAuth** tab
8. Note down your:
* **Client ID**
* **Client Secret**
9. Under **Redirect URIs**, add: `https://api.withampersand.com/callbacks/v1/oauth`
Common scopes include:
* `com.intuit.quickbooks.accounting` - Full access to accounting data
* `com.intuit.quickbooks.payment` - Access to payment data
For details on scopes, refer to the [QuickBooks Scopes](https://developer.intuit.com/app/developer/qbo/docs/learn/scopes) guide.
### Add your QuickBooks app info to Ampersand
1. Log in to your [Ampersand Dashboard](https://dashboard.withampersand.com).
2. Select the project where you want to create a QuickBooks integration.
 3. Select **Provider apps**.
4. Select *QuickBooks* from the **Provider** list.
5. Enter the previously obtained *Client ID* in the **Client ID** field and the *Client Secret* in the **Client Secret** field.
6. Enter the **scopes** required for your application in **Scopes**.
3. Select **Provider apps**.
4. Select *QuickBooks* from the **Provider** list.
5. Enter the previously obtained *Client ID* in the **Client ID** field and the *Client Secret* in the **Client Secret** field.
6. Enter the **scopes** required for your application in **Scopes**.
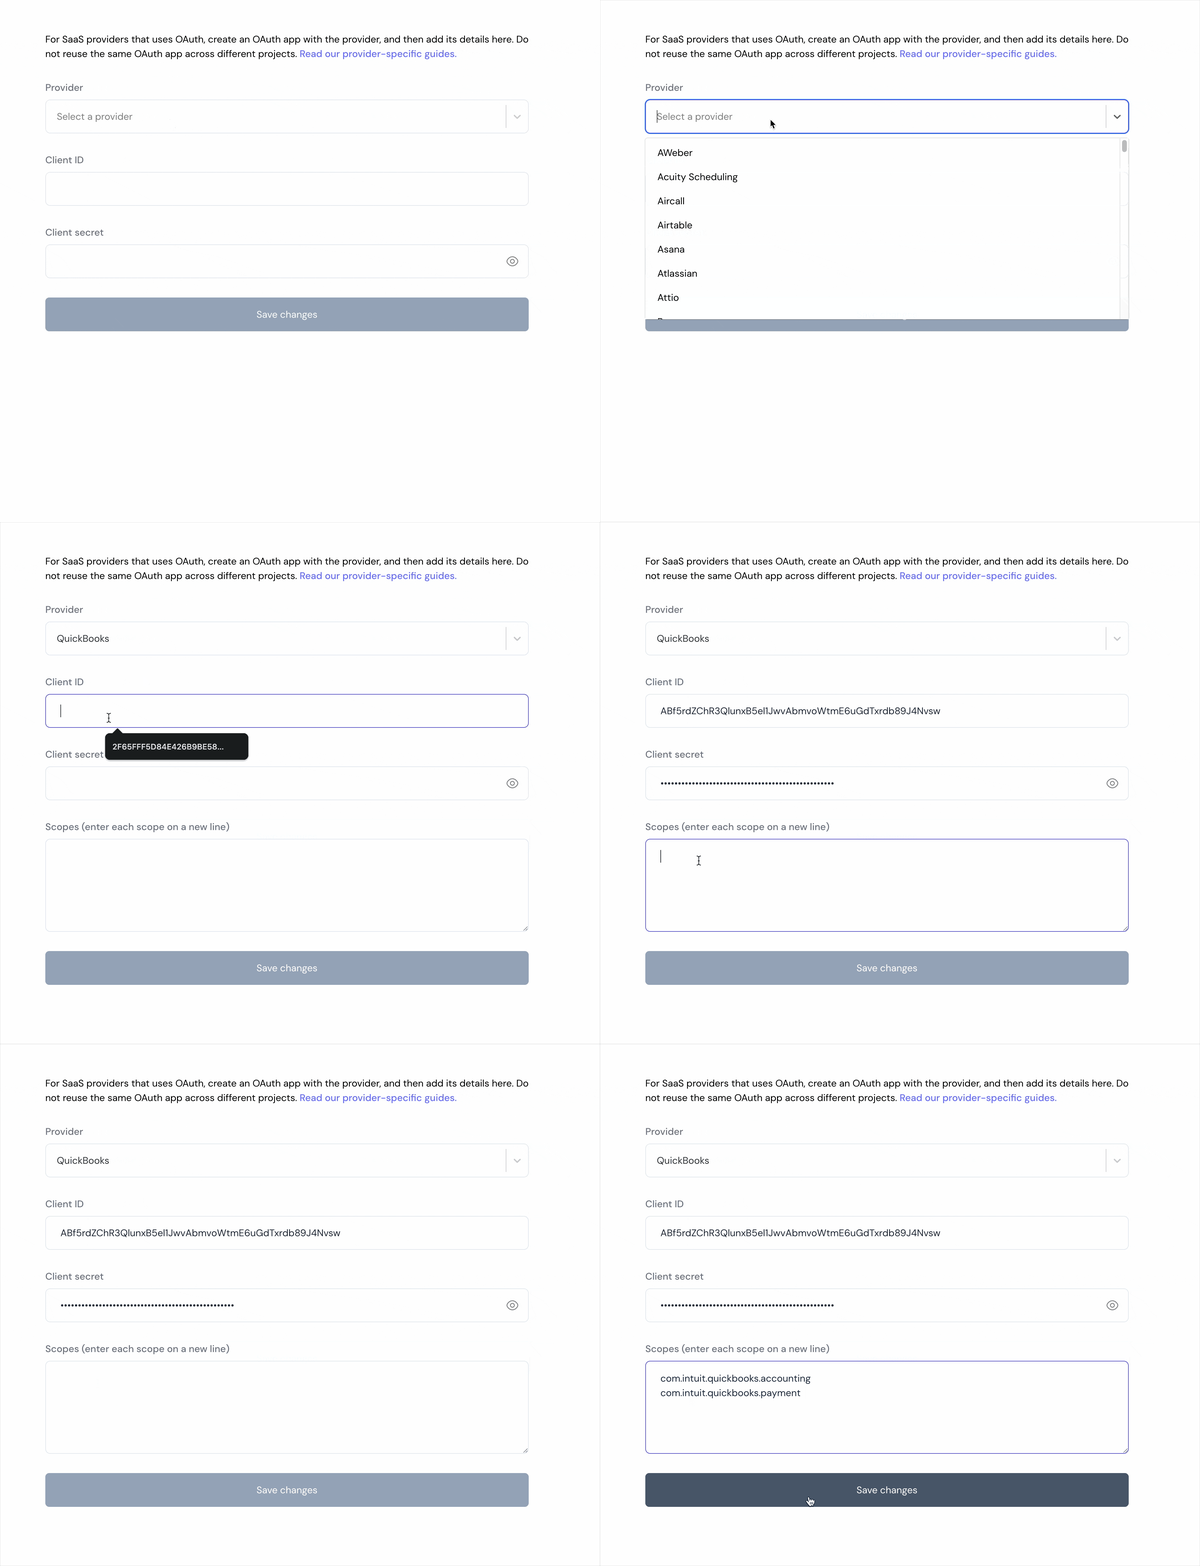 7. Click **Save Changes**.
## Using the connector
To start integrating with Kit:
* Create a manifest file as shown in the example above.
* Deploy it using the [amp CLI](/cli/overview).
* Embed the [InstallIntegration](/embeddable-ui-components#install-integration) UI component.
* Start using the connector!
* If your integration has [Proxy Actions](/proxy-actions), you can start making Proxy API calls.
## API documentation
* [QuickBooks API](https://developer.intuit.com/app/developer/qbo/docs/api/accounting/all-entities/account#the-account-object)
7. Click **Save Changes**.
## Using the connector
To start integrating with Kit:
* Create a manifest file as shown in the example above.
* Deploy it using the [amp CLI](/cli/overview).
* Embed the [InstallIntegration](/embeddable-ui-components#install-integration) UI component.
* Start using the connector!
* If your integration has [Proxy Actions](/proxy-actions), you can start making Proxy API calls.
## API documentation
* [QuickBooks API](https://developer.intuit.com/app/developer/qbo/docs/api/accounting/all-entities/account#the-account-object)